5. Reporting Services
Reporting Services are generally used in conjunction
with SQL Server and Analysis Services to generate all manner of reports.
A standard installation of Reporting Services will provide a web-based
portal where users can browse through a collection of published reports.
As an alternative to a stand-alone portal, Reporting Services can also
be installed in SharePoint integration mode. As the name suggests, this
mode provides a much higher degree of integration with SharePoint. All
report data, rather than being stored in a dedicated Reporting Services
database and presented via a stand-alone portal, is now stored directly
within SharePoint lists and libraries.
Creating a Reporting Services Report
Let’s take a look at creating a report using
Reporting Services and publishing it to a SharePoint document library.
Before Reporting Services can be used with SharePoint, you need to
install and configure the Reporting Services add-in for SQL Server 2008
R2. The add-in can be downloaded from www.microsoft.com/downloads/details.aspx?FamilyID=16bb10f9-3acc-4551-bacc-bdd266da1d45&displaylang=en. After you’ve installed the add-in, do the following:
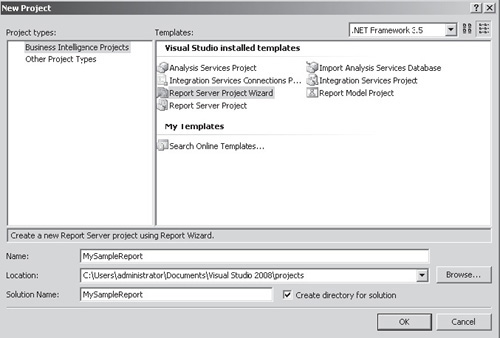
Start
the SQL Server Business Intelligence Studio application, and then
create a new project using the Report Server Project Wizard template, as
shown next:
We’ll
make use of the AdventureWorks sample database for this report. In the
Report Wizard dialog, click Next to move to the Select the Data Source
step. Create a new data source and name it AdventureWorks. Set the connection string to point to the AdventureWorks sample database.
Click
the Make This A Shared Data Source checkbox. By making the data source
shared, it will be published as a separate data source item in
SharePoint; this will allow it to be reused by other reports. The
alternative to a shared data source is an embedded data source, where
the details are embedded within the report.
Either click the Query Builder button to create the following query or manually enter it into the Query string text box:
      SELECT      C.FirstName,
                  C.LastName,
                  C.Phone,
                  E.Title
      FROM        HumanResources.Employee as E
      INNER JOIN  Person.Contact as C
      ON          E.ContactID = C.ContactID
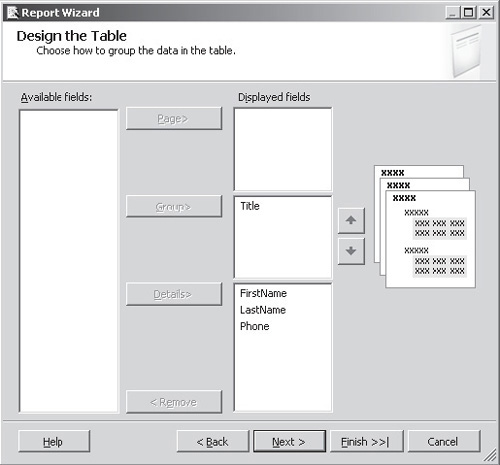
Create a Tabular report grouped by Title with FirstName, LastName, and Phone in the Detail section, as shown here:
Click Finish and then name the report Telephone Directory.
Before
we can publish the new report to SharePoint, we need to let the project
know where to store the various components, such as the data connection
and the report definition. To set these options, choose Project |
MySampleReport Properties.
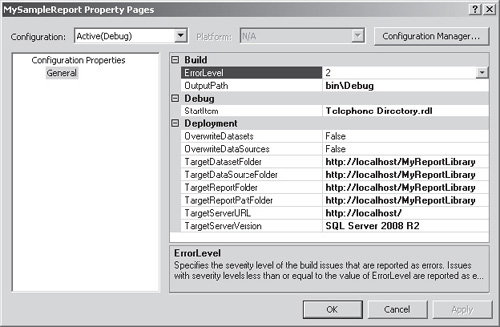
In
the Deployment section, specify appropriate values for each target
folder and the TargetServerURL, as shown next. Notice that the folders
must be fully qualified URLs and the TargetServerURL must be the URL to
the SharePoint site where the reports will be deployed.
To
deploy the report to SharePoint, choose Build | Deploy MySampleReport.
If everything is properly configured, the report and its associated data
connection will be uploaded to the configured SharePoint document
library.
To view the report, simply click the item in the document library.
Creating a report and publishing it to SharePoint is
no more difficult than creating a Word document or any other content.
Since the report is stored within SharePoint, it is automatically
subject to the same security and information management policies as
other content.
Report Builder
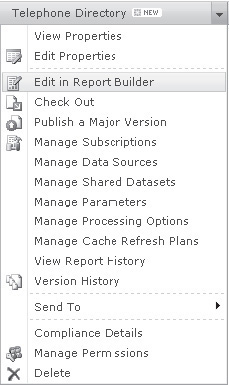
After a report has been published to SharePoint, it
can be modified by users who have the appropriate permissions by using
the Report Builder tool. Like the PerformancePoint Dashboard Designer,
the Report Builder is a click-once application that can be accessed
directly from within SharePoint. To open a report using the Report
Builder, select Edit in Report Builder from the context menu, as shown
here:
Reporting Services Web Part
When a
user clicks a report in a SharePoint library, the report is
automatically rendered on the page. It should come as no surprise to
learn that this is done using a Reporting Services–specific web part.
However, having such a web part available presents the opportunity to
integrate Reporting Services content with other content on pages within a
SharePoint application.
For us developers, being able to amalgamate Reporting
Services content with application-generated content greatly increases
the flexibility of our applications. When it comes to displaying or
printing application data, offloading the task to Reporting Services
provides a whole host of functionality that would be very time-consuming
to build from scratch.